Thursday, 24 November 2016

Hello December By Stampin' Up! On Sale Now


 Hello December by Stampin' Up! & Project Life 


Wow! How awesome is this fabulous discount on the Project Life Hello December Card Collection & Accessory Pack available for a very limited time. You can get yours up until Monday 28th November (11:50pm) for 30% off! Hurry stocks are limited so make sure you get in quick to take advantage of this fabulous offer. What perfect timing to get our Hello December albums kick started.

What is a Hello December Album you might ask?
A Hello December Album is an ultra simple stylish & festive way of getting photos off your camera & devices & into an album. It’s a great way of documenting your moments in the exciting month of December by simply adding your photos to an album. What a great way to share your December days with family & friends.

What do I need to make a Hello December album?
1  An album. I will be using the Stampin Up! Emerald Envy 6 x 8” Project life album & 2 packs of the variety pack photo pocket pages.
2  Holiday-themed products.  Stampin’ Up! Have released the Hello December 2016 Project life Card Collection & the coordinating Accessory pack to document the season (available now @ 30% off!)
3   Photos of your December activities


I’m working with a team of demonstrators to bring you a fabulous resource: an exclusive Facebook group with ideas and inspiration to help you set up and complete your Hello December album. As one of my valued customers, you will receive FREE ACCESS to this group when you order the Hello December Card Collection and Accessory Pack.

The accessory pack & card collection are super versatile (gotta love this!) & make great Christmas Cards or could even be added to your planner to help you plan all of your events for December. The washi & overlays are super cute & perfect for Planners.

To take up this offer please contact me to place your order & confirm you would like to join our Facebook group. 
Here is my shop link in case you NEED it now! 

I am looking forward to sharing ideas & providing inspiration with you. 

Thanks for stopping by

Tricia 


Sunday, 16 October 2016

CTC#100 A Little Christmas Magic


Welcome to the CASE-ing the Catty Sunday Blog Hop. It's an extra special hop today its our 100th!  Today we are being inspired by the Presents & Pinecones section of the Holiday Catty pages 18-31.  There were so many options to choose from in this section!  I have had an idea in my head since I saw the Christmas Magic stamp set, but until now I haven't had the chance to try it.


Here is the image from the catty of this set.


While this is certainly a lovely card, I couldn't figure out why the design team didn't use the gorgeous train stamp, that is a central part of this set on any cards in this catalogue.  

My son, had a slight addiction to Polar Express when he was younger & made me sit through hundreds of hours watching it.  Once I saw this stamp set I just knew I had to get it.  I brought back so many memories of us watching the movie & the lovely feel of it.  How could I not use that train in my card today?!  So, my card today is dedicated to him & his Polar Express addiction. 

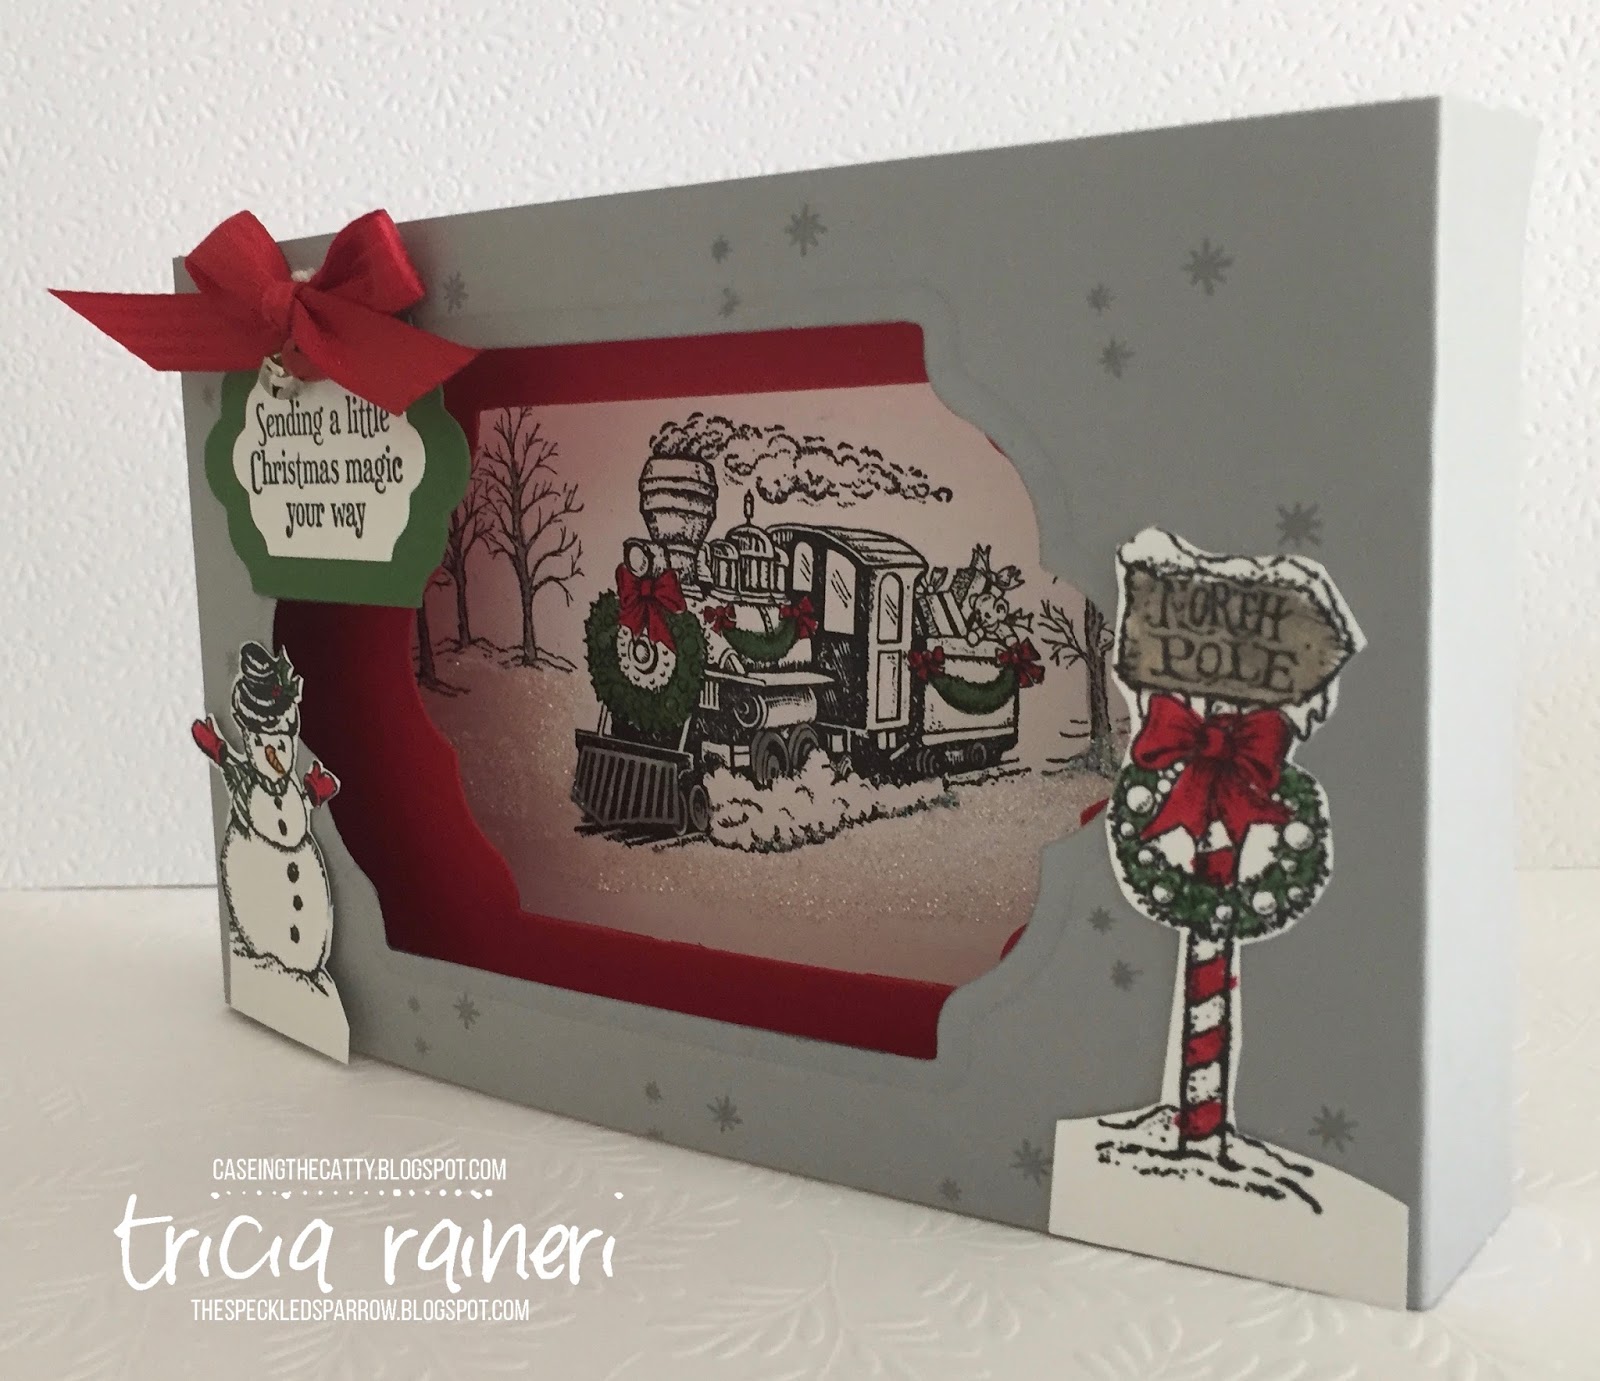
I wanted to make this a special card.  One that he can keep on his special shelf (where he keeps all things special to him) & a diorama card was my choice. 

Here are a few pictures of my card: 


I based my diorama card on one I found on youtube by Linda Dalke.  As you can see the depth of my card is a lot skinnier than hers.  I wanted to use this as a project for my stamp club ladies as well so they needed to be able to mail it if they created it.  The great thing is this card folds flat so can be mailed.   

I also wanted to be able to get one card out of one sheet of card stock.  If you use the same colour front & back you will only need the one sheet of A4 cardstock.  For my project,  however, I chose to use 2 different colours for the outside, Whisper White & Smokey Slate.  I used Real Red as the inside layer.  This colour scheme is actually pulled from the card featured in the catalogue as seen above.  So, it really did inspire me. 


To make my version of the card you will need:
  • 2 x pieces of cardstock measuring 21.5cm x 10.5cm (I used Smokey Slate & Whisper White) scored at either end at 2.5cm or 1")
  • 1 piece of cardstock measuring 19cm x 10.3cm ( I used Real Red) scored at 1.5cm or around 1/2" 
  • Extra cardstock for stamping & colouring the embellishments to the front. 
  • 2 x Jingle bells & some Dazzling Diamonds Glitter .
Start by cutting out the windows.  I start with the front piece, using the biggest framelit.  I have used the Lots of Label Framelits, but you can use any shape as long as they're layering framelits & fit the card front.  Lay this over the red piece to gauge where you want the smaller framelit to go & mark it with a pencil.  I chose the next size down to cut this red window.  

Once these are lined up & cut, lay the red piece over the back piece (white) & use a pencil to mark my area that is visible.  Then do my stamping on the white piece making sure the main item is visible in the window area.   Once it is all decorated & glitter is applied, attach the red piece to the white piece, using tear tape. 


Decorate the front piece (Smokey Slate) with stamping & images & then attach to the back section with tear tape.  The best way to understand the making of these cards is to watch Linda's video, it explains it all really well. Click on her name above to go to her video. 

I made another diorama card while I was perfecting the technique, using the cute Merry Mice set. It really is a versatile layout. This time, I popped up the little mice on the base layer giving the impression of a third layer. 


Well, that's it from me today. Thanks so much for hopping along with us. I hope you are inspired to give a diorama card a go yourself or maybe even create something inspired by our awesome catalogues.


Next on the hop is Bronwyn from Addinktive Designs where I am sure you are going to be totally inspired, I just love her 3d items!


As always, don't forget you can join in the fun & share something you've made inspired by this section too. Just click through to the link below to add your creation. 


Thanks for stopping by
Tricia 


SaveSave Product List

Sunday, 4 September 2016

CTC94 Candy Cane Lane Gifts

Well hello there.  Thanks for joining us for our CASE-ing the Catty Blog Hop.  We are now CASEing the wonderful Holiday Catalogue, in particular, the Cany Cane Lane suite on pages 4-7.

I love, love, love the Candy Cane Lane suite.  I love the colours & the cute designs.  Today I am loosely CASEing the cute box on the left side of this picture & the tags on page 4.  I am going for a general feel here, though...you'll understand once you see my project. 


While decorating the jar I decided it would look great with a tag like the ones on page 4

As you can see I have CASEd the one on the bottom left...kind of! ;) 

I have had this little jar thingy since last Christmas.  I bought it in the sales after Christmas with this year's gift giving in mind.  I am hoping to add some gingerbread mix inside & give it away with a little spatula.  An all in one Gingerbread Jar gift.  
Here is my Jar:


How lush is that Real Red Stitched edge ribbon! It finishes off the jar just nicely, don't you think? 
While I was making the jar I thought hmmmm... this needs a matching card, so I made one of those too!
Here is the matching card: 


And here they are together:

Candy Cane Lane jar & matching card.

I have used the new Candy Cane Lane Baker's Twine with the metallic red through it to string up my banner of goodies snipped out of the DSP.   It's so easy to create lovely projects with this DSP.  I can't wait to make some more, I just wish I had bought more of those white jars! 


To hop onto the next project by the lovely Simone, click on the next button below.  If you would like to go backwards, click on the previous button to view Krissy's fabulous project again.   

Until next time....


 If you would like to enter our challenge with one of your own CASEd creations, here is the link:


Thanks for stopping by

Tricia 


Product List

Friday, 2 September 2016

2016 Stampin' Up! Holiday Catalogue - Its here!!!!!


It's finally here...the 2016 Stampin' Up! Holiday Catalog.  It features tons of fabulous products, lots of terrific bundles and amazing coordinating products for Halloween, Christmas and New Years.  
I have to admit...I think this is the best Holiday Catalog ever!  It's hard to pick out my favorites as so many made the list.  Sit back and enjoy browsing through the catalog.  With each page turn, you'll find another winner.  Be sure to have paper and pencil ready to write down your favorites and let the shopping begin!

Here is the PDF link, but as always on the right-hand side of my blog is clickable picture link. 
Links to my shop are there too, or just call or email me to order your fabulous new products. 


Thanks for stopping by

Tricia 


Sunday, 28 August 2016

CTC 93 Artistic Expressions Touchable Texture

Welcome back to another week of Blog hopping with CASE-ing the Catty. This week we are CASE-ing the Artistic Expression section of the Annual Catalogue from page 92-157.  SO much to choose from.

Today I have chosen to case a card on page 105.


I'm a very tactile person & this touchable texture card using the Petal Burst embossing folder peaked my interest.  I hadn't used Flower Shop stamp set in ages so I dug it out & made this.  You can never have too many birthday cards & this one already has a new home to go to.


I am totally not an orange loving gal, but I do love this new Peekaboo Peach colour. It's bright, yet has a lovely softness to it.  I don't have the Congrats framelits so a simple stamped sentiment replaced this.  I also used Flirty Flamingo & Daffodil Delight for my flowers & teamed them with a Dapper Denim sentiment.  I always find myself reaching for the gorgeous new In Colours when creating new projects.  

Whilst I was creating this card the postman delivered my preorder box, so I cracked that open & had a little play with some new Holiday Catalogue products, using the same card design.  


I have used the Holly embossing folder along with the new Holly Berry Happiness bundle.  Aren't bundles great! A punch & a matching stamp set - Yay!  I've also used a small strip of the bright but very pretty (there will be more projects to come using this) Presents & Pinecones DSP. Once again, I used another new In Colour - Emerald Envy.  Teamed with Real Red, White & a touch of Mint Macaron it makes a great Christmas combo.  

Well, that's it from me this week.  I can't wait to have a proper play with my Holiday Catalogue products.  OMG they are all so beautiful, you will all love this catalogue.  Not long now to wait, as it goes live September 1st! 

Next up on the hop is Deb at A Time To Stamp,  I am sure you are going to be inspired. by her creation.  


Thanks for stopping by
Tricia 

If you would like to join in our challenge & create your own CASE, click below.  There have been some great entries so far! 


Product List